How to activate PlanDeer Looking for How to activate JiffySlider?
To continue with uninterrupted use of PlanDeer beyond the trial period, you need to activate the Product. Please find below, the steps to be followed to obtain the Activation Code and activate PlanDeer.
Compatibility Information (Before installation, make sure you have downloaded the appropriate version of PlanDeer):
Microsoft Excel (2013 and 2010) 64-Bit, Windows 64-Bit -> PlanDeer 10 64-Bit
Microsoft Excel (2013 and 2010) 32-Bit, Windows 64-Bit -> PlanDeer 10 32-Bit
Microsoft Excel (2013 and 2010) 32-Bit, Windows 32-Bit -> PlanDeer 10 32-Bit
Pre-requisites for Activation
- You should have downloaded and installed appropriate version of PlanDeer.
- You should have completed the Payment process (In case you are activating PlanDeer – Free Planner, see point #3 below). In case you haven’t yet purchased the license, go to our download center and click on appropriate “Buy” button (based on which PlanDeer product/pack you want to buy) and complete the payment procedure.
- If you are activating PlanDeer – Free Planner, then there is no payment process involved.
Activation Procedure
- Open PlanDeer 10 planner document. Ensure that Macros are Enabled (Very Important). If you are activating PlanDeer – Free Planner, then open its planner document.
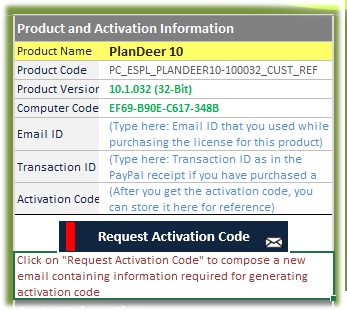
- Go to “About_PlanDeer” worksheet
- In the “Product and Activation Information” table, fill up Email ID (email id from which you made the purchase) and Transaction ID (This is the “Receipt No” or “Transaction ID” in the email receipt that you have received from PayPal). For activating PlanDeer – Free Planner, the Transaction ID is not required since the planner is free.)
- Click on “Request Activation Code” button. This opens a new email composed through your email client (if email client has been installed on the system), with the prefilled details of Product Version, Computer Code, Transaction ID and your email ID. (In case you haven’t entered the Email ID and Transaction ID information in the “About_PlanDeer” sheet, you need to enter that in the email. (See note below in case you do not have an email client configured)
- The email would be automatically composed and ready to be sent to our support channel, with the information required for activation. Verify the details and send the email.
- Usually, you would receive the activation code within 1 or 2 business days.
- On receipt of activation code, click on the menu PlanDeer10., you will see Activate button. (If you are activating PlanDeer – Free Planner, click on menu PlanDeerFreePlanner) Click on Activate button and a window pops up. Enter the Activation code that you have received from us, in the “Activation Code” field. Press OK and proceed.
- Alternately, if the trial period is coming to an end, the tool would prompt the entry of activation code when you open PlanDeer file. You can enter the activation code directly in the box provided for the same and activate the Product. Even if you do not activate during the trial period, you can utilize all the functionalities of the tool
- For the sake of reference, after you receive the code, enter the activation code in the space provided in “About_PlanDeer” sheet.
Note 1: In case email client is not configured on the system, you need to manually compose the email with the above details and send it to support –at- excelsquare-dot-com. For this purpose, you can copy the Activation Information table from “About_PlanDeer” worksheet and paste it into your email.
Note 2: If the trial period has already expired and you are not able to open the document, then copy the Computer Code shown on the screen requesting for activation code (while you open the document) along with the product version number given in the message and send along with the other details as explained above. Please note that is important to mention the product version number so that you receive the appropriate activation code.